CUDA Installation on Ubuntu 22.04 in 10 mins
Hi All! This blog will help installing CUDA on Ubuntu 22.04 in the shortest way possible without having to go through the driver hassles.
This blog assumes that the system doesn’t have any pre-installed NVidia Drivers and addresses the NVidia CUDA as CUDA
Before proceeding to Install CUDA Toolkit on Ubuntu, let’s try to understand what components of CUDA get installed and why they are needed.
Components of the CUDA Toolkit and the Driver Package
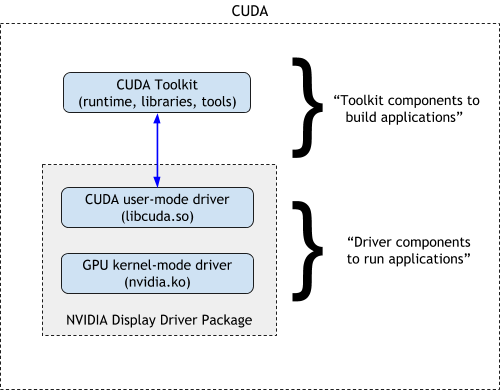
When we perform the toolkit installation, both the CUDA Toolkit along with a compatible NVIDIA Display Driver Package gets installed. The NVIDIA Display Driver Package consists of both the CUDA Driver(libcuda.so - (so - shared object)) and the GPU Kernel driver(nvidia.ko - (ko - kernel object)) as shown in the figure below which is taken from the CUDA Compatability Page
I am planning to write a more detailed summary as to what each of the components do, but for now : The libcuda.so acts as the interface between the CUDA application and the NVIDIA driver, while nvidia.ko handles the low-level communication with the GPU hardware.
The driver that comes along the toolkit supports all the features introduced in that version of the CUDA Toolkit.As it is stated on the NVIDIA website, it is highly recommended to install a compatible nvidia driver when installing cuda on a system.
Verifying for a CUDA-capable GPU
1
$ lspci | grep -i nvidia
Verfiying the linux version support
1
$ uname -m && cat /etc/*release
Verfiying gcc for CUDA
1
$ gcc --version
Verifying the System Kernel
1
$ uname -r
CUDA Installation from NVIDIA Developer
We will be using the Network repo installation by downaloading the toolkit from the Developer Link: https://developer.nvidia.com/cuda-downloads
Once on the page, you might need to create an NVidia Developer Account to download the toolkit
You should see something similar to this on the Downloads page with the CUDA Toolkit 12.2 version. 
Lets install CUDA 11.8 as it is the latest version that is supported by the majority the current ML/DL training and inference framework versions like tensorflow, pytorch, tensorrt etc.
After scrolling down, you should see an option: Archive of Previous CUDA Releases, select that.
Once on the new page, select the CUDA Toolkit 11.8.0 (October 2022), Versioned Online Documentation
Select all the fields as required for the system 
To find out the system architecture in ubuntu, use the command below in a terminal
1
$ uname -m
Follow all the commands
1
2
3
4
5
6
wget https://developer.download.nvidia.com/compute/cuda/repos/ubuntu2204/x86_64/cuda-ubuntu2204.pin
sudo mv cuda-ubuntu2204.pin /etc/apt/preferences.d/cuda-repository-pin-600
wget https://developer.download.nvidia.com/compute/cuda/11.8.0/local_installers/cuda-repo-ubuntu2204-11-8-local_11.8.0-520.61.05-1_amd64.deb
sudo dpkg -i cuda-repo-ubuntu2204-11-8-local_11.8.0-520.61.05-1_amd64.deb
sudo cp /var/cuda-repo-ubuntu2204-11-8-local/cuda-*-keyring.gpg /usr/share/keyrings/
sudo apt-get update
The last command has to be modified to ensure that the apt-get package manager installs the correct version i,e cuda 11.8.
1
sudo apt-get -y install cuda-11-8
Hope this helps!
Update Edit : Troubleshooting Ubuntu 22.04 upgrade newer kernel issue with nvidia drivers
Sometimes when the ubuntu kernel headers are updated to a newer version, the nvidia-drivers may fail to boot up correctly and would need to be reconfigured. so, when executing the command nvidia-smi in the terminal, it might result in the following output:
The first step in troubleshooting this is to ensure if you have the right nvidia driver versions installed on your system. It is also recommended to have a driver whose version is atleast newer to the base driver that the cuda toolkit comes with ( this is to ensure correct version compatability between the cuda runtime and nvidia drivers).
Next, remove all the currently installed nvidia drivers and cuda binaries from the system using the following command
Update Edit: Troubleshooting with multiple kernels and dkms
while troubleshooting, one might also benefit with checking the dynamic kernel module support(dkms) for the supported NVidia drivers for the specific host’s kernel
1
dkms status
Ideally, there would be a single dkms for the kernel version that is on the host as the following
since dkms is specifically designed to support multiple dkms modules and multiple kernel versions, there could be cases like these ones
so, one way to handle this is to delete the dkms modules for the kernel versions not in use or wouldn’t be used
1
sudo dkms remove -m nvidia -v <version>
or to remove the dkms modules for all the kernels for that specific NVidia driver version
1
sudo dkms remove -m nvidia -v <version> --all
Manual NVIDIA Driver Installation
and then one can look into purging all the existing nvidia drivers(.ko), cuda binaries(.so), removing them from disk and cleaning them from the cache
1
2
3
4
sudo apt-get remove --purge "*nvidia*"
sudo apt-get remove --purge "*cuda*"
sudo apt-get autoremove
sudo apt-get autoclean
And, it has been observed as a best practice to update to the latest ubuntu kernel headers or reinstall the exisitng latest version so not to miss any patches for these issues.
1
sudo apt install --reinstall linux-headers-$(uname -r)
installing dkms back (if one had to delete them)
1
sudo apt install nvidia-dkms-<version>
and verifying if the kernel module is installed correctly
1
sudo apt-cache policy linux-modules-nvidia-<version>-$(uname -r)
Now after a quick reboot,we can search for the latest driver versions available through the apt package manager using
1
apt search nvidia-driver
And then, a series of available drivers should appear something like as shown below
Select the appropriate version for the cuda toolkit and the ubuntu kernel as mentioned above,(for example, I chose to install the driver version 525)
1
sudo apt install nvidia-driver-525
Once the driver is installed, we can check if it was installed using the command:
1
nvidia-smi
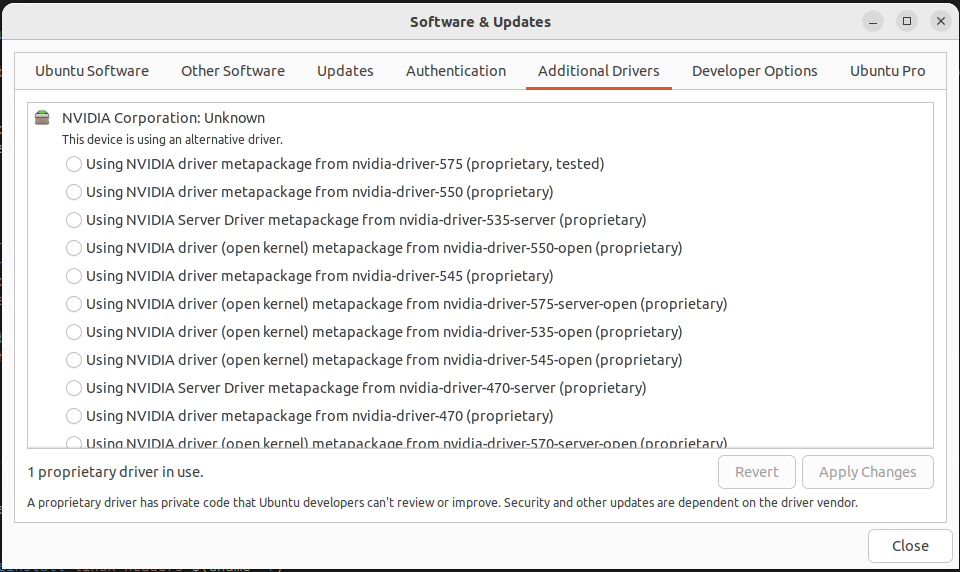
or one can also rely on the software and updates GUI installer if they need abstraction from all these above steps and just want to install an nvidia driver that works, but following the above steps to delete and clean both the disk and cache would still help
Manual CUDA Installation with the runfile
Now that we have installed the NVidia Driver, let’s install the cuda runtime through the runfile. Installing it this way provides us an option to only install the cuda shared object binary and not the NVIDIA driver again that is associated with the Toolkit. Again, visit the Archive of Previous CUDA Releases and select the version of cuda toolkit/runtime you want to install. Select all the options related to the Architecture, Distribution and version as applicable and for the installer type select the option runtime(local) which should provide the two terminal commands to download the runfile and to install the runtime through this file.
Once you execute the second command, three dialogue boxes appear in order. Click on continue to proceed from the first box.
For the second box, accept the End User License Agreement.
In the final dialogue box, you get the options to choose what to install. Uncheck/De-select the Driver as we already installed it through the apt package manager and installing the driver that is accompanied with the runtime leads to having two drivers on the system - which again leads to issues.
We can check if cuda is properly installed on the system using :
1
nvcc --version
which should result in something as follows:


